Deep Learning Image Processing
This article was originally posted here: Deep Learning Inference with Scilab IPCV – Pre-Trained Lenet5 with MNIST by our partner Tan Chin Luh.
You can download the Image Processing & Computer Vision toolbox IPCV here: https://atoms.scilab.org/toolboxes/IPCV
This is the first post about DNN with Scilab IPCV 2.0, first of all, I would like to highlight that this module is not meant to “replace” or “compete” others great OSS for deep learning, such as Python-Tensor-Keras software chain, but it is more like a “complement” to those tools with the power of Scilab and OpenCV 3.4.
In this tutorial, we are going to load a pre-trained LeNet-5 model with MNIST dataset, and quickly test the model with our own handwriting. This will not take long, less than 10 lines of codes, you could load and use the pre-trained model on the fly.
- Loading Model
- Model Information
- Running Forward Pass
Loading Model
In this version, we could load pre-trained tensorflow and caffe model. Let use look into how to load the tensorflow model in this tutorial.
We assume that Scilab 6.0.1 already launch with IPCV 2.0 loaded, as shown in the following figure:

There is a tensorflow model shipped with the IPCV 2.0. Let’s load it into Scilab.
dnn_path = fullpath(getIPCVpath() + '/images/dnn/'); net = dnn_readmodel(dnn_path + 'lenet5.pb','','tensorflow'); |
the “dnn_path” is the IPCV folder which keep all the images and models. We then load the tensorflow model “lenet5.pb” into Scilab and save it into “net”.
Model Information
Let’s explore “net” object for the model information.
net net = identifier: [1x1 string] name: [1x1 string] type: [1x1 string] ptr: [1x1 constant] layername: [15x1 string] |
net.layername ans = !conv2d/Conv2D ! ! ! !activation/Relu ! ! ! !max_pooling2d/MaxPool ! ! ! !conv2d_2/Conv2D ! ! ! !activation_2/Relu ! ! ! !max_pooling2d_2/MaxPool ! ! ! !permute/transpose ! ! ! !reshape/Reshape/nchw ! ! ! !reshape/Reshape ! ! ! !dense/MatMul ! ! ! !activation_3/Relu ! ! ! !dense_2/MatMul ! ! ! !activation_4/Relu ! ! ! !dense_3/MatMul ! ! ! !activation_5/Softmax ! |
The object “net” keep some information about the loaded DNN, and the field “layername” store all the layers’ name. This information is important when we want to run a forward pass of the network to a certain layer and get the feature maps of that layer.
The summary of the model summarized as below:
[Conv–>ReLU–>MaxPool] –> Convolution Layer – 6 filters. (5×5)
[Conv–>ReLU–>MaxPool] –> Convolution Layer – 16 filters. (5×5)
[Dense–>ReLU] –> Fully Connected Layer – 120
[Dense–>ReLU] –> Fully Connected Layer – 84
[Softmax] –> Fully Connected Layer – 10
Running Forward Pass
Running forward pass of a DNN with an input means to feed and image through the DNN and get the output at the desired layer. If we pass the data until the last layer, it just simply means that we are using the network for prediction purpose. Let’s see how we use the LeNet-5 model to predict the handwriting digits.
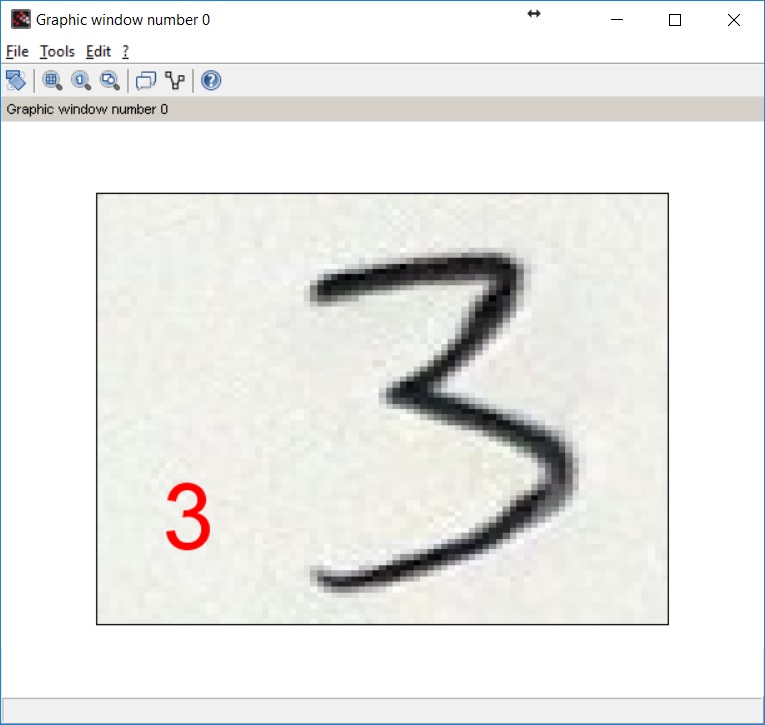
// Read Image S = imread(dnn_path + '3.jpg'); imshow(S); |
The display out should give you following output
disp(out') 0. 0. 0. 1. 0. 0. 0. 0. 0. 0. |
Started with 0, the 4th element of ‘1’ indicates that the image is likely to contains digit ‘3’.
Let’s make it more proper :
[maxV,maxI]=max(out); xnumb(10,10,maxI-1); e = gce(); e.font_size = 10; e.font_color = 5; |

You could try your own handwriting, remember that the background should be black, and the image should be converted to gray-scale (using rgb2gray function) if your image is taken by hand-phone or other camera devices.
S = imread('yourimagefile.jpg');
S = rgb2gray(S);
|
Once you have done, unload the model to free the memory.
dnn_unloadmodel(net) |
To keep the article short enough for reading, we would only go into the “inside” of a DNN in the next tutorial. This also allows the users who are not interested in the DNN details to just choose the articles which are relevant to DNN inference so that they could quickly build and run the DNN system, as a prototype or even end product for desktop implementation.
